Ipinapakita ang mga post na may etiketa na Computer tips. Ipakita ang lahat ng mga post

Lunes, Nobyembre 11

Simple and basic tutorials on how to have a live streaming video to your site


Hello this is Clint Hisoler from basictips101, today I going to discuss you guys about how can you add live streaming video to you own blog r site in order you to live your self online. If you don't have  a blog or site you can create a free site using blogger.com, or wordpress.com. 

First is you need to setup a specific page for your own blog or site, for example,  www.yourname.com/livepage, this page is where you can paste the code in order to broadcast you live streaming video online. Second is you need to sign up to this free site list which allow you to add the specific code to your site or blog to have a live streaming video. 

These are the free site which allow you to live stream your self online:


For me I use ustream.tv for making live streaming video to my site or blog, for additional info about this topic you can also add live chat features using this free site that I gave you. these are the couple thing you can do.

1. sign in to your site, and sign in also one of the site above to get your self up and running.
2. Add one specific page to your site just for the stream, where you can paste or embed java script or applet to your blog or site
3. Once you've already log in to ustream.tv or something like ustream, and look for the embed code, Once you have the code paste that to the specific page just for the live streaming video.

To get that embed code, go to to my show in ustream and below it you can copy the embedded code and paste it to you dedicated page and BOOM you have your own live streaming video. For the live chat feature, its similar to live stream. just copy the code and paste it some where in your blog. 


Linggo, Nobyembre 10

Receiving Payment from Bubblews to your non verified Paypal account - make money by posting article online

Many members from Bubblews ask this question, if they can receive payment from Bubblews to their non verified Paypal account! Yes! You can now receive payment from Bubblews even if you Paypal account is not yet verified.

One of my friends sign up in Bubblews for almost 1 month, and yesterday he make his 1st redemption and made a request. After 3 days of waiting the  payment is finally arrive to his Non verified Paypal account. Now If you want to earn money just posting articles online, I suggest Bubblews because for now this is the best way to earn money just by posting article to their site in any category.

Before you signup in bubblews make you read the rule and terms, because many member who sign up without reading the rule might be banned in the future. To earn cash in bubblews, make sure you have lots of connections, post, and views.

How much is the minimum cash out? you can cash out your payment to you Paypal account or e-check after you reach 25 dollars.


Here the sample payment from my friends Paypal account:


By the way if you use you internet connect in your Home, you only allowed to use two account per household. If you get banned to Bubblews, make sure to register using different IP address because I experience this issue of using same address and still Bubblews bubblews banned my account.

Lunes, Setyembre 30

How to recover deleted messages on Facebook (Download all photo on Facebook in one click)

Most of us have an Facebook account to connect people online, and most of them use Facebook chat everyday to send message to their friends. How to know if your boyfriend is cheating on you? This tutorials is for you so follow this simple tips to recover the deleted message on your boyfriends Facebook chat. You can use this tutorials also to recover you photo on Facebook (Download all photo).

Follow this tutorials:

1. First step is to log in to your Facebook account the one you want to recover the deleted messages.


2.  After you log in, click the gear icon and select account setting.


3. After clicking account setting there will be a new windows will come up. Click the Download a copy of your Facebook data. click Download archive.


4.  After the download, a new windows will come up saying enter you password. after entering the password of that account click submit, then the download will automatically start. 


NOTE: if you need to confirm it before you download to your email account do it. Sign in to your email the go to spam folder or to your inbox. Click the link back to you Facebook account then click download. . 

This information include all of the photo from that account, deleted message, videos, likes, and etc. Please comment if you have questions.


Linggo, Mayo 12

How to add a website to search engine like google, yahoo, bing etc.

If you have your own website and you want it to put it in search engine like Google so that other people from different country can visit your site and earn some credit from your site, this tutorials is perfect for you. In Google you can easily add your site to their server with this simple tutorials and also to other search engine. 

To earn unique traffic to your site you must add them to search engine like Goole, Yahoo and Bing, in order to add them you must follow this simple instruction below.

Google.com
To add your site to Goole you must have your own gmail account, if you dont have any, just sign up here. 

After signing up in gmail, go to this site Webmaster Tools and click add your URL.


After doing this procedure.


Paste the link of your website, but before you do it, type the captcha word and hit submit request. That's how you can add your site to Google index. 


Yahoo.com and BIng.com
The first thing you need to do in order  to add your site to yahoo index or search engine make sure to check if your site is already in yahoo directory by visiting this site Yahoo directory.


If your site is  included in their indexes you can put your site in their Yahoo submit your site . Just click submit your site to paste you link.


Like in Google you must sign in first in order to add your site to their indexes. In Bing you can sign up here.


Lunes, Mayo 6

How to post a link tricks to you Facebook status

This simple link tricks on Facebook status is very  simple, the function of this tricks is when some of your friends click your link status it will direct them to their Facebook page. So you can actually troll your friends with this trick.


The first step is COPY the code below, and replace the "write here" to your won words.

Code:

@@[1:[0:1: write here ]]

The second step is to post it to your status and wait for some people to click it.

Example:  @@[1:[0:1: DONT CLICK THIS LINK! IT WILL DIRECT YOU TO A COOL FACEBOOK PAGE!!]]


How to make your keyboard like a disco works on ( Win 7, 8, Vista )

Some computer trick are made to prank people but this simple computer tricks is made to amaze you coworker or your friends by making their keyboard work like disco. To perform this tricks follow some instruction below.

The first step is open a notepad from your desktop. Paste the given code below to your notepad.


The code:

Set wshShell =wscript.CreateObject("WScript.Shell")
do
wscript.sleep 100
wshshell.sendkeys "{CAPSLOCK}"
wshshell.sendkeys "{NUMLOCK}"
wshshell.sendkeys "{SCROLLLOCK}"
loop

Save the file whatever you want but be sure change the file extension to. vbs
For example: keyboardtricks.vbs


Click on the save file to see your LED light on you friends keyboard go crazy.

How to make your computer speak whatever you type in

In this computer tutorials you will learn how can you make a simple program that your computer speak whatever you input. To make this simple program all you need to do is follow some simple instructions below to create your own talking computer programs.


First step is you need to open a new notepad by right clicking your desktop and paste the code below.


The CODE:

  Dim Message, Speak
  Message=InputBox("Enter text","Speak")
  Set Speak=CreateObject("sapi.spvoice")
  Speak.Speak Message


Next is you need to save the file, in order to save it click on File Menu then Save as select All Types in Save as Type option, put .vbs for the file extension. the vbs file extension work on all windows type computer.

Example:  Computer.vbs


Try it on your computer by typing some word.

Miyerkules, Mayo 1

How to install lkl keylogger on linux


Linux computer is not like windows computer that you can easily install software on it, for example if you want to install key logger on windows you can easily click the installer and follow some instruction to install it, but in Linux you need to type the code to the terminal to install the software. 

Here some instructions on how you can install lkl key logger on Linux computer.

first step is you need to download the file from this site.

1. Go to your terminal and type this code "tar -zxvf lkl-0.1.1.tar.gz".

2. If there is an error type this code "cd ~/Downloads" and hit enter.

3. Type again this code "tar -zxvf lkl-0.1.1.tar.gz" and hit enter.

4. Enter this code "cd ~/Downloads/lkl" and press enter and enter this code "cd ~/Downloads/lkl" and press enter.

5. type "make install" and hit enter. If there is an error type "sudo su" if your Linux computer don't have any password, If so type "su" and enter the password of your computer and type again "make install".

6. type "./lkl" and hit enter.

7. you can send argument with the command lkl

-h help
-l start to log the 0×60 port (keyboard)
-b debug mode
-k <km_file> set a keymap file
-o <o_file> set an output file
-m <email> send logs to <email>
-t <host> hostname for sendmail. Default is localhost

Example: lkl -l -k us_km -o log.file // use USA kb and put logs in ‘log.file’

8. Type this code "./lkl -l -k keymaps/us_km --o /home/ubuntu/Documents/log.tx" and hit enter and your key logger is set up.

Let's go over what the commands that we entered were. ./lkl is obviously the name of the program lol -l sets the program into listening mode. -k is the keymap. You cannot run the program without a keymap. There are a few keymaps. You can find them in the lkl folder and check them out. -o specifies a file to store the keystrokes in. lkl's email option is ass and crashes if you uses it so you're probably better off coding your own server and add something to send files over email after a certain size. Shouldn't be too hard!
Any anything else just message me.

The log file: go to documents and read the log file.

Lunes, Abril 29

How can you leave your group on facebook

If you have a friend who added you to join on Facebook group and you decide to leave that group because sometimes their conversation goes on your facebook inbox and that's an annoying problem.

To perform the step on how to leave group on facebook just follow that simple instruction below, the easy way to leave your group on facebokk is just like a matter of click. 

The first step is open your facebook account and click Home.


After you click Home, from the left corner of your facebook account click the group that you want to leave.


After you open your group click the small gear icon from that group and click leave group and your problen is solve.


For more information about computer like us on facebook to update some tutorials.

Linggo, Abril 21

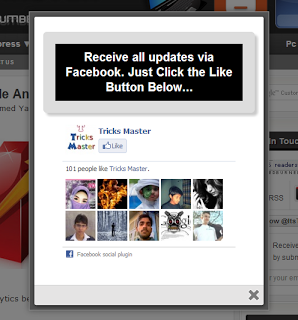
How to add pop up facebook like page or box to your blogger


Pop up facebook like box can help your site earn more unique traffic, if you have lots of likers to your page there are posibility that if you post your links to your fan page the member might click it and link it to your site.

So in order to add a pop up facebook to your blog you must do the instruction below.

First is to sign in to your blogger account and then go to layout the click add gadget.


After clicking the add gadget go to html/javascript and add this code below.

<script src="http://exeideasinternational.googlecode.com/files/jquery.colorbox-min.js"></script>
<script type="text/javascript">
jQuery(document).ready(function(){
if (document.cookie.indexOf('visited=true') == -1)
{
var fifteenDays = 1000*60*60*24*30;
var expires = new Date((new Date()).valueOf() + fifteenDays);
document.cookie = "visited=true;expires=" + expires.toUTCString();
$.colorbox({width:"400px", inline:true, href:"#exestylepopups"});
}
});
</script>
<style type="text/css">
/*
ColorBox v1.3.16
(Copyright (c) 2011 Jack Moore - jack@colorpowered.com)
*/
#colorbox,#cboxOverlay,#cboxWrapper{position:absolute;top:0;left:0;z-index:9999;overflow:hidden}#cboxOverlay{position:fixed;width:100%;height:100%}#cboxMiddleLeft,#cboxBottomLeft{clear:left}#cboxContent{position:relative}#cboxLoadedContent{overflow:auto}#cboxTitle{margin:0}#cboxLoadingOverlay,#cboxLoadingGraphic{position:absolute;top:0;left:0;width:100%}#cboxPrevious,#cboxNext,#cboxClose,#cboxSlideshow{cursor:pointer}.cboxPhoto{float:left;margin:auto;border:0;display:block}.cboxIframe{width:100%;height:100%;display:block;border:0}#cboxOverlay{background:#000;opacity:0.5 !important}#colorbox{box-shadow:0 0 15px rgba(0,0,0,0.4);-moz-box-shadow:0 0 15px rgba(0,0,0,0.4);-webkit-box-shadow:0 0 15px rgba(0,0,0,0.4)}#cboxTopLeft{width:14px;height:14px;background:url(https://blogger.googleusercontent.com/img/b/R29vZ2xl/AVvXsEin8Y_mdZxdt3OauzL8iNT2hF8RaoxitnqOXiwT4xJSaUYaau_J2XUcnSr3Exg-QLJH2PNl9jeHySV0SdV5SwJw5oXxJIeOLwst7vrKMthbqeSO2lYN38guDF3n0WJomWbOQ5PtUU5BYZk/s1600/controls.png) no-repeat 0 0}#cboxTopCenter{height:14px;background:url(https://blogger.googleusercontent.com/img/b/R29vZ2xl/AVvXsEhFFtkyabSdLatjEtJrIoPLyr7XrbT3Yn0EFrr7iFN85pWQqT8VDsV8MIfHS19CRnZqpBUSBV9bK_GF8EYGGsH8lyNqeVybWhg5XuLFgIsuXS3GaNwEhKn65Fi7PMZHTTjED4Y2c6nd428/s400/border.png) repeat-x top left}#cboxTopRight{width:14px;height:14px;background:url(https://blogger.googleusercontent.com/img/b/R29vZ2xl/AVvXsEin8Y_mdZxdt3OauzL8iNT2hF8RaoxitnqOXiwT4xJSaUYaau_J2XUcnSr3Exg-QLJH2PNl9jeHySV0SdV5SwJw5oXxJIeOLwst7vrKMthbqeSO2lYN38guDF3n0WJomWbOQ5PtUU5BYZk/s1600/controls.png) no-repeat -36px 0}#cboxBottomLeft{width:14px;height:43px;background:url(https://blogger.googleusercontent.com/img/b/R29vZ2xl/AVvXsEin8Y_mdZxdt3OauzL8iNT2hF8RaoxitnqOXiwT4xJSaUYaau_J2XUcnSr3Exg-QLJH2PNl9jeHySV0SdV5SwJw5oXxJIeOLwst7vrKMthbqeSO2lYN38guDF3n0WJomWbOQ5PtUU5BYZk/s1600/controls.png) no-repeat 0 -32px}#cboxBottomCenter{height:43px;background:url(https://blogger.googleusercontent.com/img/b/R29vZ2xl/AVvXsEhFFtkyabSdLatjEtJrIoPLyr7XrbT3Yn0EFrr7iFN85pWQqT8VDsV8MIfHS19CRnZqpBUSBV9bK_GF8EYGGsH8lyNqeVybWhg5XuLFgIsuXS3GaNwEhKn65Fi7PMZHTTjED4Y2c6nd428/s400/border.png) repeat-x bottom left}#cboxBottomRight{width:14px;height:43px;background:url(https://blogger.googleusercontent.com/img/b/R29vZ2xl/AVvXsEin8Y_mdZxdt3OauzL8iNT2hF8RaoxitnqOXiwT4xJSaUYaau_J2XUcnSr3Exg-QLJH2PNl9jeHySV0SdV5SwJw5oXxJIeOLwst7vrKMthbqeSO2lYN38guDF3n0WJomWbOQ5PtUU5BYZk/s1600/controls.png) no-repeat -36px -32px}#cboxMiddleLeft{width:14px;background:url(https://blogger.googleusercontent.com/img/b/R29vZ2xl/AVvXsEin8Y_mdZxdt3OauzL8iNT2hF8RaoxitnqOXiwT4xJSaUYaau_J2XUcnSr3Exg-QLJH2PNl9jeHySV0SdV5SwJw5oXxJIeOLwst7vrKMthbqeSO2lYN38guDF3n0WJomWbOQ5PtUU5BYZk/s1600/controls.png) repeat-y -175px 0}#cboxMiddleRight{width:14px;background:url(https://blogger.googleusercontent.com/img/b/R29vZ2xl/AVvXsEin8Y_mdZxdt3OauzL8iNT2hF8RaoxitnqOXiwT4xJSaUYaau_J2XUcnSr3Exg-QLJH2PNl9jeHySV0SdV5SwJw5oXxJIeOLwst7vrKMthbqeSO2lYN38guDF3n0WJomWbOQ5PtUU5BYZk/s1600/controls.png) repeat-y -211px 0}#cboxContent{background:#fff;overflow:visible}#cboxLoadedContent{margin-bottom:5px}#cboxLoadingOverlay{background:url(https://blogger.googleusercontent.com/img/b/R29vZ2xl/AVvXsEgVNOQg6JAO24BIs6fCrtMW8l0j4H8Mg-Wi5Z43jB96nK_iHS9HzsQuKopAhWv4fJnmibon1AslBRlvfAycKlzlmBFuMLo50UexVX1YTxvbbSO6SaMH88XtIVBxqMKl3HLdv-BYIlr4_iM/s400/loadingbackground.png) no-repeat center center}#cboxLoadingGraphic{https://blogger.googleusercontent.com/img/b/R29vZ2xl/AVvXsEi-f6o6XRQs64lqgawAPx2GpwyXpoKmkUa4ydwXi3ec8zCyxLyrz9N9lkjdMv7GWmkHrmy-CQuPAgYNEDEebZ16jf0EXg4OfIzG2GpD9vM8WPx6yr2xW3_E3oZZsZrKLgMU-76IwDUHnTk/s400/loading.gif) no-repeat center center}#cboxTitle{position:absolute;bottom:-25px;left:0;text-align:center;width:100%;font-weight:bold;color:#7C7C7C}#cboxCurrent{position:absolute;bottom:-25px;left:58px;font-weight:bold;color:#7C7C7C}#cboxPrevious,#cboxNext,#cboxClose,#cboxSlideshow{position:absolute;bottom:-29px;background:url(https://blogger.googleusercontent.com/img/b/R29vZ2xl/AVvXsEin8Y_mdZxdt3OauzL8iNT2hF8RaoxitnqOXiwT4xJSaUYaau_J2XUcnSr3Exg-QLJH2PNl9jeHySV0SdV5SwJw5oXxJIeOLwst7vrKMthbqeSO2lYN38guDF3n0WJomWbOQ5PtUU5BYZk/s1600/controls.png) no-repeat 0px 0px;width:23px;height:23px;text-indent:-9999px}#cboxPrevious{left:0px;background-position:-51px -25px}#cboxPrevious.hover{background-position:-51px 0px}#cboxNext{left:27px;background-position:-75px -25px}#cboxNext.hover{background-position:-75px 0px}#cboxClose{right:0;background-position:-100px -25px}#cboxClose.hover{background-position:-100px 0px}.cboxSlideshow_on #cboxSlideshow{background-position:-125px 0px;right:27px}.cboxSlideshow_on #cboxSlideshow.hover{background-position:-150px 0px}.cboxSlideshow_off #cboxSlideshow{background-position:-150px -25px;right:27px}.cboxSlideshow_off #cboxSlideshow.hover{background-position:-125px 0px}#mdfb{font:12px/1.2 Arial,Helvetica,san-serif;color:#666}#mdfb a,#mdfb a:hover,#mdfb a:visited{text-decoration:none}.mdbox-title{background:#000;color:#fff;font-size:20px !important;font-weight:bold;margin:10px 0;border:20px solid #ddd;-moz-border-radius:6px;-webkit-border-radius:6px;border-radius:6px;box-shadow:5px 5px 5px #CCC;padding:10px;line-height:25px;font-family:arial !important}
</style>
<div style='display:none'>
<div id='exestylepopups' style='padding:10px; background:#fff;'>
<center><h3 class="mdbox-title">Receive all updates via Facebook. Just Click the Like Button Below...</h3></center><center>
<iframe src="//www.facebook.com/plugins/likebox.php?href=http%3A%2F%2Fwww.facebook.com%2FYOUR_FACEBOOK USERNAE&amp;width=300&amp;colorscheme=light&amp;show_faces=true&amp;border_color=%23ffffff&amp;stream=false&amp;header=false&amp;height=258" scrolling="no" frameborder="0" style="border:none; overflow:hidden; width:300px; height:258px;" allowtransparency="true"></iframe>
</center>
<!--Please Do not Remove the Credits -->
    <p style=" float:right;  margin-right:35px;  font-size:9px;" >Powered By <a style=" font-size:9px; color:#3B78CD; text-decoration:none;" href="http://yaqoobforall.blogspot.com/">Tricks Master</a></p>
</div></div>
 box. This is done using the CSS 'background-color' property.


Replace the red text to your own desire and click save.


Miyerkules, Abril 10

How to send your photo in facebook chat box

Facebook now a days is very popular social networking site on the Internet some people use the chat box to communicate to other people in other places but not many of them know the tricks about facebook chat box. This tutorials you will some of the best tricks on how to send your photo or someone photo using facebook chat box.

- First thing you need to do is follow the simple instruction below,  and visit this site SMILEYCODE to start the tutorials.


- Once you've done clicking the site, choose the image you want to send just by clicking the choose file and click upload now.
- Wait until the upload finished.


- Once the upload finished cpy the code tht will appear in the site and paste it to your facebook chatbox.


Thats how to send photo using facebook chatbox.

How can you block any website without using any program

In this tutorials you will learn a simple step to block any website without using any program just by adding some code to the notepad.

First thing you need to do is open your my computer and click the drive c then open windows folder and open system32, drivers, etc, hosts.

like this: C:\Windows\System32\drivers\etc\hosts


After you've done this, right click the HOSTS file and click OPEN, once a new windows appear choose NOTEPAD and hit enter.


Once you've choose the notepad its something look like this.


Copy the 127.0.0.1 localhost and paste it below, but replace the localhost to the site which you want to block, something like this.


After you replace the localhost to the site you want to block go file and hit save, or just press Ctrl+S to save the notepad.

NOTE: to unblock the site, just delete the 127.0.0.1 www.facebook.com and save the file.

How to hide drives from your friend windows 7 computer

In this tutorials you will learn how to hide some drive "drive D" from your friends computer by following some simple instructions below.

- First thing you need to do is right click on the my computer shortcut and click manage


- Once the the computer management appear go to Disk management


- In the disk management panel right click the drive you want to hide and go to change drive letter and path .


- Click remove and hit ok to hide that certain drive from you computer.


- Try to check in my computer if that drive is missing.


Now you hide that certain drive from your victims computer, in order to show that drive repeat the procedure from the top but this time click Add button and follow the simple instruction that will appear. . 


Now the drive is back

Martes, Abril 9

How to prank your friends laptop using USB sound notification

Watch this video!


Level up your April Fool's game. Let's get evil and really mess with our friends and family this April 1st. Here are 7 nasty tricks to play on anyone. Don't blame me if you get punched

In order to do this kind of tricks toy our Friends, first is to download the sound from here, and follow some instruction below.

Note to Windows Users:

To use these, go to your windows default sound settings (in the control panel) and change the "Device Notification" sounds.

- just click the start button and type "mmsys.cpl" in the run menu and hit enter


- The above image is the sound panel of windows 7.
- Click the sound from menu button.
- The device connect is sound for inserting you usb device and the other is for unpluging the device.
- Change the Device Notification by browsing the moaning sound which you downloaded.
- Hit apply and click ok and your done.


And for Mac users:

Go to the following directory: /System/Library/Components/CoreAudio.com­ponent/Contents/Resources/SystemSounds/ Then replace the sounds you wish to change out. Make sure to back up your old ones first.

Linggo, Abril 7

How to add 5 rating widget to your blog

How effective is your Blog Post? Does your reader like your post? Are they satisfied with your post? All this questions are an important aspect of Blogging career.To get your readers feed back there are comments in your blog. But not every reader would comment on your blog as it takes a bit time. 

In this post, you will learn a very simple and effective way of getting feed back from your readers just by adding simple 5 start widget to your blog. This widget are easy to use and are easiest way of getting feed back from reader. The star rating we are gonna add has 5 Stars. This 5 star will show your posts effectiveness. So add this to your blog.

The first step is you need  to log in to you blogger account and copy the code below and paste it any where in your template where you want the star ratings to appear.

- Go to layout
- Click add a gadget
- Open HTML/javaScript
- Paste the code and save it.

<span class='star-ratings'>
<b:if cond='data:top.showStars'>
<div expr:g:background-color='data:backgroundColor' expr:g:text-color='data:textColor' expr:g:url='data:post.absoluteUrl' g:height='32' g:type='RatingPanel' g:width='180'/>
</b:if>
</span>


Now you have your 5 star rating appear in your blog.


Huwebes, Marso 28

How to play or install android game on pc

In this tutorials you will learn how to play your favorite android games to your pc or laptop by following this very simple instruction made by this site.

First thing you need to do is visit this BLUE STACKS site. The image below is showing you the page of the site, choose  the type of your operating system and wait until the download finished.


After downloading, install the software and wait until finished installing. 


After finished installing search your desired android game and your done. 


There you have your android games in you pc. . enjoy


Martes, Setyembre 11

How to partition a hard drive on Windows 7 step by step tutorials

Partition a hard drive


Encase you forgot to partition you HDD during the Installation of your OS here is the tutorials on how to partition your hard drive using the simple command on your computer.

- The first step to perform the partition is start to click on START command on your Desktop.
- Then go to to COMPUTER (don't click) just right click and go to MANAGE.


- After clicking MANAGE the new window will come up.
- In the menu command from the left side of your screen select or click DESK MANAGEMENT.
- The other new window will come up.


- On the screen select the drive C, this is the drive that you are going to divide.
- Right click on C that has a blue line color.
- And Click Shrink VOLUME.
- Then the setup is preparing the system (it takes 10 min).


- Then another new windows will come up.
- Enter your desire value to partition in MB.
- This means that for every 000001 number is equal to 1MB and 000010 is equal to 10 MB.
- For example your HDD size is 500GB
  500GB in MB is 500000 MB.
- Then click SHRINK.


- Then the new volume will display that is your new partition from drive C (the black line).


- Right click the new partition and then click NEW SIMPLE VOLUME
- Click NEXT
- Click NEXT
- Choose your desire letter. 
- Then click NEXT


- After you choose the letter
- Click NEXT
- Click NEXT
- Click FINISH are your done with partitioning your drive C.

Check from your MY COMPUTER your new drive D. THANK for visiting.

Lunes, Setyembre 10

Install Windows 7 from USB or CD step by step tutorials

Install Windows 7


This article show How to install Windows 7 from USB drive Easy Tutorial with the help of software like Novicorp WinToFlash or Windows 7 USB/DVD. Download Tool make bootable pen drive and it more concentrate on WinToFlash because windows 7 USB/DVD tool only works for official iso image file which is downloaded from Microsoft
. 
Tutorial helps to install USB way on a netbook or notebook (without CD or DVD-ROM) using Novicorp WinToFlash software. Click here to learn how to use WinToFlas.

Step 1

-Set up or turn On your laptop, insert the installer (CD or USB drive) and restart your laptop.
-Press F2 to enter to the BOIS or CMOS setup of your Laptop.
-In the BIOS menu use the arrow on your keyboard to select the BOOTING menu and press ENTER.


After you enter to booting setup select USB-HDD when you are using USB installer otherwise select CDROM for those who using CD installer, make sure that the usb-hdd or the cdrom is set to Fisrt Boot.

-Press F10 to save the setup then your computer will restart.

Follow the procedure below

Loading Files


Starting Windows


Click NEXT


Click INSTALL NOW


Click Accept and then NEXT


Click CUSTOM 


Click DRIVE OPTION


Click FORMAT for clean Install.


Click NEW and make your desire  partition of you HDD, or just click NEXT to Install the OS.
Installation is starting.


After the Installation is complete your computer will start. 
Note: When you are using using USB make sure you remove your USB after your computer restart.

Computer is updating Registry setting.


Starting Services


Setup Is Completing Installation


Computer Is Restarting


Starting Windows Again


Setup Is Preparing The Computer


Setup Is Checking Video Performance


Enter (User Name) & (Computer Name) but you also can click next id you don't want to have to enter your pass and username.


Enter Password


Click (Use Reccomended Settings) or just ask me later button.


Click (Home Network)


Click (Home Network)


Finalizing Settings


Done you can now use your new Windows 7.


After Installing your new OS you can now start installing drivers to your laptop.